If I had to recommend one trail in Glacier National Park as “must-do”, it would be the Highline Trail hike. It takes you along the mountain side and alpine environments of Glacier National Park with incredible stunning views. And if you opt for the side trail, a view from above of a glacier. Seeing a glacier is one of the main reasons you came here right?
About the Highline Trail Hike
Distance: 15-18 miles | Type: Point to Point or Out and Back | Avg. Time: 8-10 hrs. | Difficulty: Hard
The highline trail is a pretty full day affair with about 15 – 18 miles depending on the direction you take and if you do point to point or out and back. The trail takes you from Logan Pass to the Granite Chalet and back with an option to do the Garden Wall trail up to Grinnell Glacier (highly recommend). Expect to take 8 or more hours to complete the trail.
This is the best trail I believe for a Glacier National Park day hike. You’ll see the variety of landscapes, alpine environments, and likely many types of wildlife as well. We ended up seeing quite a few different animals from elk, mountain goats, big horn sheep, and moose. Also some really cool grouse and pikas as well!
Best Times to do the Highline Trail
Summer to Early Fall is the best time to do the Highline Trail. Actually in general a lot of Glacier National Park is difficult to access outside of those times due to snow or road closures. Mid to late summer you’ll get the best weather, and it’ll actually likely feel hot at times with sun exposure and exertion on the trail.
We did the hike in mid-August and it was perfect weather wise for the trail.
How to Get to There
Getting to the trailhead is possible either through private vehicle or shuttle. Car is certainly easier for schedule, however it requires a car reservation or really early start. Shuttles can be easier than dealing with parking. Be sure to check Going-to-the-Sun Road closures, vehicle size restrictions, etc. before going.

By Car
The best place to park for the Highline Trail is the parking lot for the Logan Pass Visitor Center. The trail starts across the Going-to-the-Sun road from the parking lot. Look for the Continental divide sign that is near the road/parking lot entrance and cross over from there. You’ll see the start of the trail.
Note: This parking lot is the start of several trails and can be very busy. Go early! Even if you have a reservation for the going-to-the-sun road, if you are here after about 7/7:30 am you likely won’t find parking. We recommend arriving by 6/6:30 am during summer.
By Shuttle
There is a Glacier Going To the Sun Road Shuttle that travels along the trail and stops at Logan Pass. The shuttle system does a pretty good job and leaves from Apgar in the West or St. Mary’s in the East. Just be sure you pay attention to times and be sure to be done with plenty of time before the last shuttle.
Hiking the Highline Trail
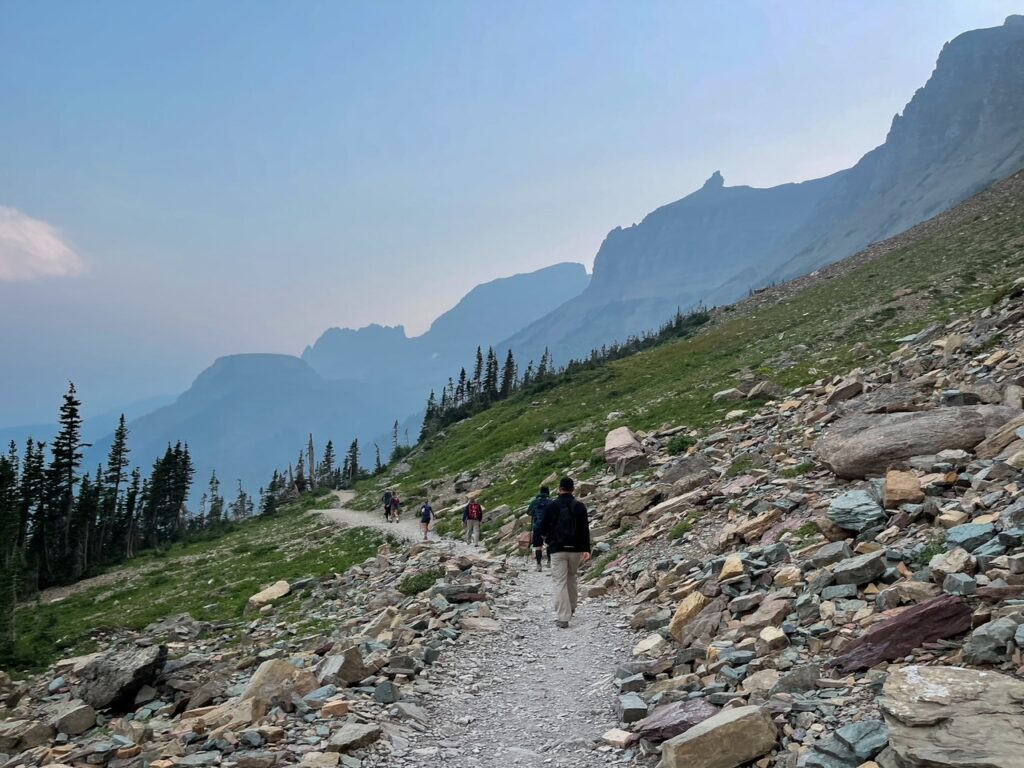
The trail starts from the Logan Pass Parking lot. The trail starts from across the street from the parking lot. You’ll likely see people along the mountain if hiking if you look.

Head to the entrance to the parking lot, you’ll see the Continental Divide sign a bit down from there. It’s worth taking a quick photo if you want before crossing the road to start the hike. You’ll see a small trail and probably lots of people as well. You’ll see a sign across the road for Highline Trail.
The Trail starts pretty easy. You’ll head through the woods for awhile. The trail goes up and down a bit here. I recall hating this so much on the return of the journey as I desperately tried to get to my car for water. But I digress. It’s nice that it starts pretty mild.

Following this the trail does start to ascend pretty quickly. For the most part the trail is pretty mild in elevation gain up and down during this part of the hike. But you’ll be heading up now to the cliff side trail. The trail is a mix of dirt and gravel and this point.


The views start to get more epic as you continue along the trial. The trail in many places at this point is pretty narrow. There’s actually some black rock, and steep ledges. This is probably one of the steeper areas of the hike, and certainly can be intimidating. I think once I did this the other ledges didn’t feel so bad. The hand rail is a bit weird (it’s like a garden hose), but it’s definitely helpful if you are concerned. It’s not a long portion of trail, maybe a 1/4 mile max.
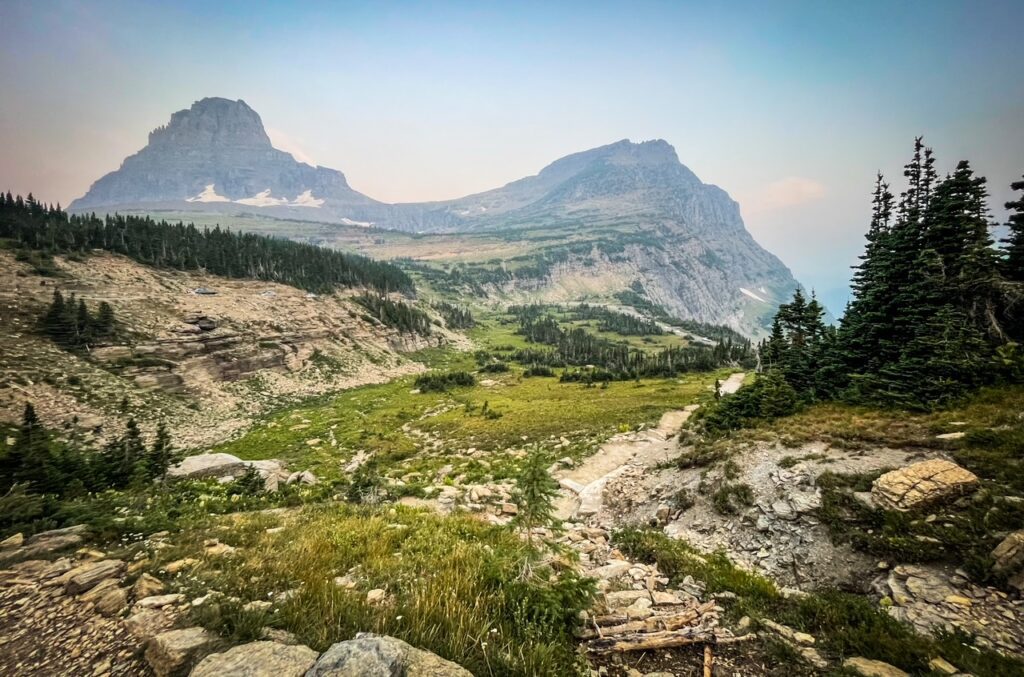
The narrow ledge part at that point isn’t too bad. Once you get past that, the trail opens up more and gets more level. You don’t have the same fear of falling off the mountain now. The trail levels out now for the next several miles.

This area is great for the views and for catching wildlife. It will continue this way up through haystack pass. Which is the highest point you’ll hit on this part of the trail (if you don’t go to Grinnell Glacier Overpass).

The trail gets a bit rocky here for while once you hit the area of haystack pass. You’ll likely see the area get more rocky before it opens up again. It was also where I started really seeing more wildlife around and past this point.
Haystack pass is a super popular place to relax and get a snack. The trail opens up more here and it feels like it goes in multiple directions. So be sure to know where you plan to go. If you go the wrong way you might get some cool views, but you’ll need to backtrack a bit.
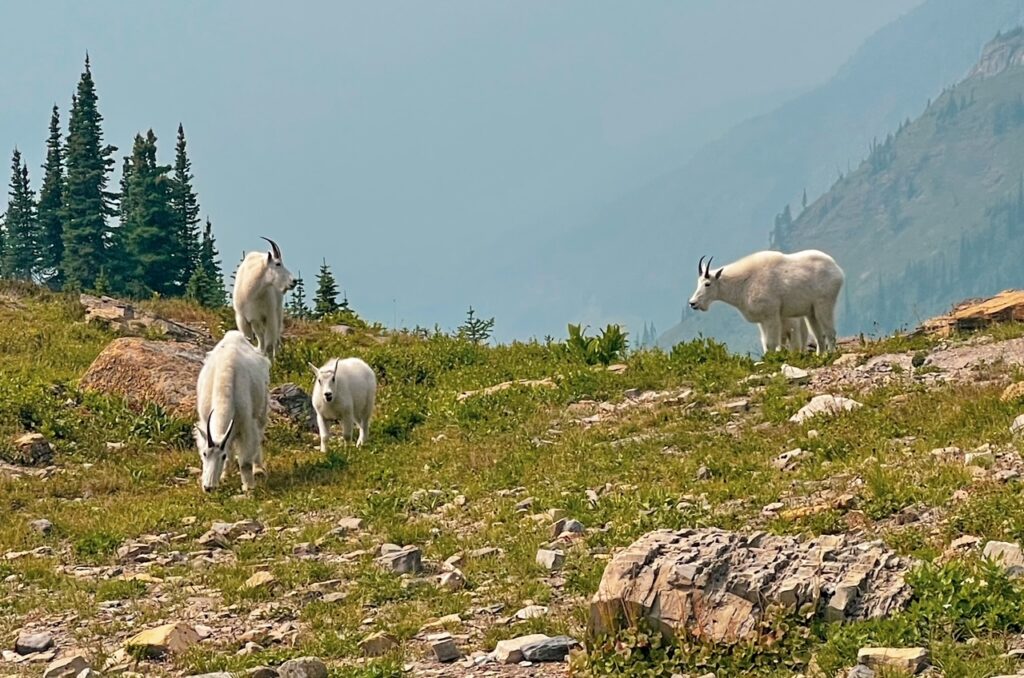
One of my favorite parts while sitting and snacking was seeing the above family of mountain goats arriving. They started walking towards me which was cool but also nerve wracking. Didn’t want to spook them with those sharp horns on their head.

The trail descends a bit here, and it stays smooth for the next several miles. This is also where I saw the most wildlife as well.

First Time I saw and heard one of these Dusky Grouses in Glacier National Park. They make such a distinct mating call.
Continue on the trail for several miles until you reach a fork in the trail. You now have a choice. If you continue straight you’ll continue on to the Granite Chalet which is part of the Highline Trail. If you go right, you’ll take the Garden Wall Trail towards the Grinnell Glacier Overlook. This section of the Garden Wall is about 0.9 miles each way on this out and back trail. If you don’t want to do the Grinnell Glacier overlook you can skip the next section.
Garden Wall to Grinnell Glacier Overlook
The Garden Wall trail is the steepest part of the hike. It climbs about 1000 feet over this 0.9 miles so expect a bit of a slog up hill (especially after the 7 miles of hiking so far).
In my opinion, hiking to the Grinnell Glacier overlook was worth the extra mileage. Expect to go slow during this part of the hike as its a steep uphill climb.

Be sure to keep your eyes out for big horn sheep in this area of the trail. They tend to really blend into the background here. We saw several of them (we were very lucky). These were hard to see at first then moved further down the trail. This photo was taken on the way back down.

The view is definitely the best of the trail. However, as with many things in the area, the glacier has shrunk considerably over recent years. It’s among the ways you can see the affects of global warming in the area.


For those with some more time or more energy in the tank. You should head right from here along the cliff. You’ll get a very cool view down on the glacier. Definitely the best place for photos. You’ll also get less competition as most people don’t leave the first viewpoint.
From here the only option is to return the way you came. The hike back down is much faster than the way up. Just be careful about your knees.
Hike to Granite Park Chalet
If you are planning to do the hike as a point-to-point. You’ll need to hike to Granite Chalet and then down to the road. If you are doing an out and back, you can likely skip this part.

The hike to Granite Park Chalet is pretty easy going. It’s less than a mile from the fork in the trail to the Granite Chalet. You’ll see it in the distance as you hike towards the Granite Chalet.

The Granite Park Chalet is a pretty cool lodge that you can book and stay at during your time in Glacier National Park. There are quite a few longer trails that continue from this area. If you want to stay at Granite Park Chalet you’ll need to book very far ahead of time.
There’s no water at the lodge (or at least not when I was there), but there are bathrooms if you need to use them. And picnic tables, if you want to sit and eat.
After checking it out and taking a break you can continue to head down the trail to the road. If you are planning to take the shuttle, just make sure the shuttle is running that day and the schedule. It’s usually quite frequent during the summer. If not you’ll need to walk along the road back to your car or hike back along the highline trail. We did an out and back ourselves.
Tips and FAQs
- Pack lots of water and snacks. It’s a very long hike and water is not available on the trail. You don’t want to run out of water. I did with miles left to go, and it was concerning.
- Pack sunscreen. Most of the trail is unshaded.
- If you are doing out and back, you can skip the trail to the Chalet if you want. The Grinnell Glacier overlook is better and you should do that if you only have time for one. Although there are bathrooms at the Chalet (but no water). We ended up having lunch there before heading out.
- Start Early. The Highline Trail Hike is difficult and long. It’s an out and back trail, so the further you go, the further you need to return. It’ll likely take more than 8 hrs. to complete the whole trail.
- If you don’t have the full day. It’s worth seeing some of the trail. It still has some great views and high chance of wildlife sightings.
- Download offline maps of the hike. It’ll help with navigation as sometimes the trail can be tricky (and its nice to know how far you went).
- Bring Trekking Poles. These were a lifesaver and knee-saver across my hiking in Glacier National Park
- Wear good boots or trail shoes. You don’t necessarily need boots, but I would recommend sturdy good footwear. I preferred the good ankle support though as there are parts with rocks that can be unsteady.
Other Posts you May Like
- MONTANA: How to Get to Glacier NP
- MONTANA: Guide to Visiting Grant-Kohrs Ranch NHS
- MONTANA: Visitor’s Guide to Pompey’s Pillar NM
Leave a Reply